Developer
Getting Started Guide
Required Software
For newer campus lab computers, you may not need to bother with this. Administrator access is required to install many of these tools.
- Visual Studio 2019
- Compilers, build tools, and runtimes
C++ Clang Compiler for Windows (8.0.0)
C++ Clang-cl for v142 build tools (x64/x86)
- Development activities
Visual Studio C++ core features
- SDKs, libraries, and frameworks
Windows 10 SDK (10.0.17134.0)
ReSharper
Cloning the Repository
Verify Git is installed
Verify Git-LFS is installed
To test, open a Command Prompt and run git lfs version. Git LFS is installed if a you see a git-lfs version number.
- Log in to GitLab.com to verify you have access to the project.
You can copy the repository URL from the clone button.
- Clone the repository:
http: https://gitlab.com/supremetoyinc/tempestengine.git ssh: git@gitlab.com:supremetoyinc/tempestengine.git
It is recommended to use the SSH method for accessing the repository. It is more reliable and stable than the https method. However it has a more complicated one-time setup.
Developer Getting Started Procedure
Download CMake-GUI version 3.15.0 or higher (rc is ok)
Be sure to download the Binary distribution, not the Source.
For campus computers, use the zip version of the download. Extract the zip file to c:sandboxcmake….
Start CMake-GUI and enter the following values:
Where is the source code: <<Path to Checkout>>Source
Where to build the binaries: <<Path to Checkout>>Binaries
You may have to make this directory on a fresh checkout.
This directory can be anywhere, but recommend making it parallel to the Source directory.
Click the Configure button and select the following options:
Specify the generator for this project: Visual Studio 16 2019
Optional platform for generator: x64
Toolset to use: clangcl
Click Finish button
Click the Generate button
Click the Open Project button to open Visual Studio
Set the Editor or Bootstrap project as your Startup project.
Only the executable projects can be started with the debugger. These are Bootstrap, Editor, UnitTests and AudioTool.
Adding a new Source/Header File
Creating a new Module
Create a directory in the Source directory for the new module
Create the CMakeLists.txt file in the new directory with the following content:
Replace <<ModuleName>> with the name of the module
Replace <<header>> and <<source>> with names of your source files
Replace <<dependencyModule>> with the name of dependency modules
cmake_minimum_required(VERSION 3.15.0)

# define target
add_library(<<ModuleName>> STATIC
    Public/<<header>>.hpp Private/<<source>>.cpp
)

# expose headers
target_include_directories(<<ModuleName>>
    PUBLIC Public
)

# link to dependencies
#target_link_libraries(<<ModuleName>>
#    PRIVATE <<dependencyModule>>
#)
Create Public and Private subdirectories
Add Module to Source/CMakeLists.txt registry
Link to an Existing Module
Add the needed module to the link libraries in the CMakeLists.txt file for your project.
Replace <<Module>> with the name of your dependency module
Modules With No Source Files Not Appearing in Visual Studio
If your new module does not have any compilation units (.cpp files), you’ll need to create a dummy one.
In the Private folder of your module, create a file called HEADER_ONLY_MODULE.cpp.
Add the following content to the file:
Setting Up The Tempest Prebuilder Project
** Obsolete **
Start CMake-GUI and enter the following values:
Where is the source code: <<Path to the Source Directory>>/TempestPrebuilder
Where to build the binaries: <<Path to the Binaries directory>>
This directory can be anywhere.
Click the Configure button and select the following options:
Specify the generator for this project: Visual Studio 15 2017
Optional platform for generator: x64
Optional toolset to use: host=x64
Click the Finish button
Click the Generate button
If an error appears similar to ‘“VERSION” “2.6”’, you may need to set the PYTHON_EXECUTABLE variable to the path to your python installation.
Click the Open Project button to open Visual Studio
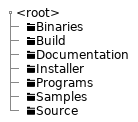
Folder Structure Overview
Purpose
The purpose of the folder structure is to easily separate modules/systems into groups so that they can be built and maintained as separately as possible.
Requirements
Project/Solution/Make files should not be intermingled with source files.
All project, solution and make files should be located at the root of the Source folder.
Modules should have publicly available files in a separate folder than private source files.
All .cpp files should be in the Private structure.
Never assume a module will be linked into the same assembly as another module.
PropertyFiles should be used to configure projects.
Private property files should be created for each project to control project level settings.
A project should only reference public property files from other projects.
A project should only reference public property files from third party
Folder references should use the $(SolutionDir) macro as a base.
Third-Party code will be kept separate from propritary code.
Third-Party binaries will be kept separate from propritary code.
Project and Project Configuration Files
Project and Solution files will be generated by CMake into the Binaries directory.
The SupremeToyInc.sln file is the primary solution file for all projects. Individual projects can accessed directly if desired, but will have limited interoperability.
Third-Party Location
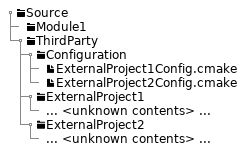
The folder structure for third-party modules will look like the following:

The Source/ThirdParty/Configuration directory is part of the search path for CMake’s find_package function.
Style Guide
Documentation Generation
We use Doxygen to automatically generate a documentation browser.
You can run the tool with the <<root>>/Programs/Doxygen/RunDoxygen.bat file. A warnings file will be created in <<root>>/Programs/Doxygen/doxyWarnings.txt where you can view any missing or incorrect tags. The output of the tool will be placed into <<root>>/Programs/Doxygen/DoxygenDocuments.
Comment Style
Add comments after
Members
Macros
Add comments before
Classes
Functions
Single Line Style (After)
//!< This is the example.
Multiline Style (After)
/*!< This is
 * the example. */
Function Headers (Before)
/*!***************************************************************************************
\brief  This just for giving an example of a function format.
\param exampleIn - dat old boring int
\return What is this returning?
*****************************************************************************************/
Class Header (Before)
/*!***************************************************************************************
\par class: classExample
\brief   This is a stub class to be used as a template / example for class formating.
*****************************************************************************************/
Namespace Closing
A comment should be added after terminating a namespace to identify which namespace it was.
} // namespace <<name>>
Indentation
Use tabs not spaces.
This allows each developer to choose their own indentation spacing using their editor. Spaces remove that freedom from each developer.
For printing or presenting code, please keep your tab size between 2 and 8 (depending on the space available).
New Lines
New lines are required at specific locations to improve readability.
At the end of each function prototype. (Don’t put two prototypes on the same line)
At the end of each section header. (Separation makes them easier to find, visually)
At the end of each file. (Make proper text files, like Mead taught us)
Line Length
Maximum line length should be 90 characters.
While many people have wide screen monitors available, most view multiple documents on a single screen. Don’t make them scroll, they may hit you with their mouse in the process.
File Header
The file header is mandatory per school requirements.
Authoring
The primary author of the file should be designated in the file header. The existing author should only be replaced if the new primary author has significantly modified the code or how the functionality works.
File Section Headers
The SectonHeaders.hpp and SectionHeaders.cpp files contain all appropriate formatting headers required.
Order of the section headers must be maintained. This will simplify finding information within the file.
Naming Pattern
Construct |
Format |
|---|---|
File names |
UpperCamelCase |
Classes |
lowerCamelCase |
Structures |
lowerCamelCase |
Enumerations |
lowerCamelCase |
Enumeration items* |
lowerCamelCase |
Local variables |
l_all_lower |
Parameters |
p_all_lower |
Member variables |
m_all_lower |
use Enum Classes so you don’t need an additional prefix
Changing the standard
Changing the standard is open to all developers. However, there are some caveats that must be fulfilled before a change will be enacted.
All team members must agree or abstain (not have any issues) with the proposal.
All existing code must be updated by the person proposing the change.
You want it, you’ll have to work for it. In a company, changing this may not even be possible. We’re a little more leinient, but don’t make more work for us.
The proposer must present the change to the team and teach everyone why the change was made.
